Given rising geopolitical tension, the Swedish Data Protection agency felt the need to make a public statement about the usage of US cloud providers (source). Their Norwegian and Danish counterparts went even further and called for their government agencies to have a plan to migrate away from US cloud providers (source). Needless to say, this causes a lot of anxiety with engineering teams who have never done a migration before.
This blog post helps you, the engineering team, plan and perform a successful migration, reducing risk, cost, and duration of the migration.
The rest of this blog is structured as a migration plan along three main phases: pre-migration, migration execution, and post-migration. Feel free to copy-paste and adapt this post to suit your needs to reduce your anxiety and eliminate “unknown unknowns”.
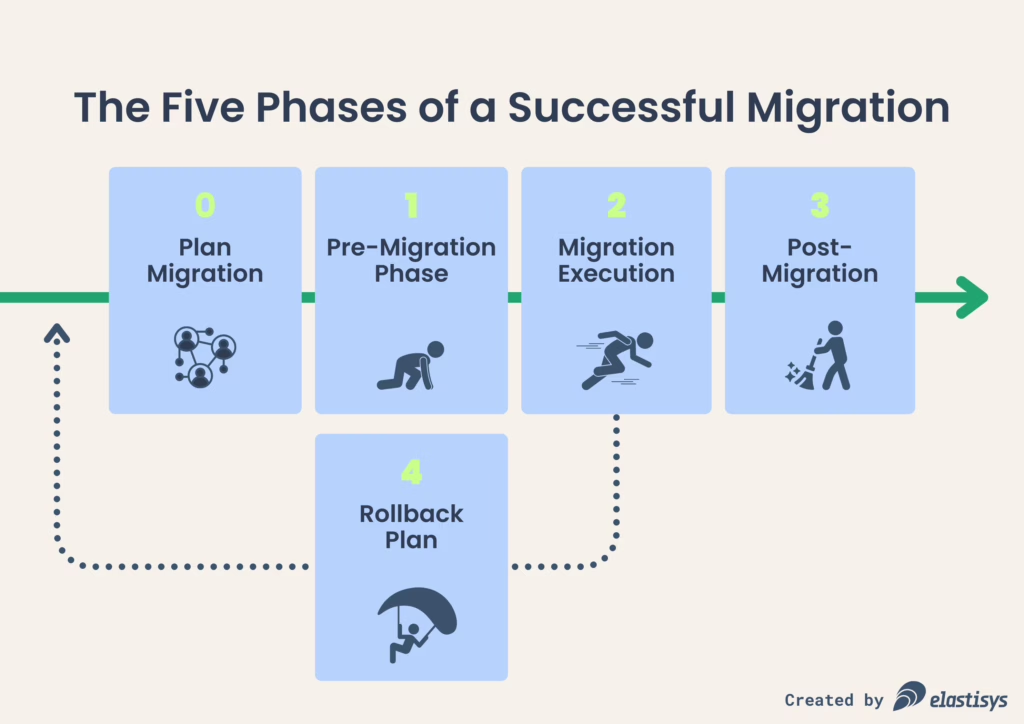
0. Plan Migration
“Phase zero” of your migration is to plan it. This planning should make it in the migration plan. Why? When producing complex documents, it’s best practice to not only include the “output” of your planning, but also the “input” to your planning. This avoids receiving comments, such as “have you thought about X?” or “did Y give input on this?”.
This section should include the following sub-sections.
0.1 What is in scope and what is out-of-scope?
It might be impractical or too risky to do one big migration of all your applications, especially if their tech stacks are too dissimilar. Therefore, you should plan and perform migration for one application (or one set of applications) at a time. Your migration plan should make it clear what is in scope and what is out-of-scope for this particular migration.
0.2 Migration Assessment
Once you clarify what application migration is in-scope, you should make a migration assessment. The migration assessment should look at the “source” technology stack, the “destination” technology stack and make a one-to-one mapping. For example, if you currently use AWS RDS PostgreSQL, then a migration to any cloud provider offering Managed PostgreSQL should be straightforward. However, if you need to migrate from AWS ElastiCache Memcached to a Managed Valkey solution, then your code should be adjusted accordingly.
As another example, if you currently use Azure SQL for storing structured data and plan to use PostgreSQL in your new production environment, then the migration effort will be proportional with how well you designed the persistence layer of your application. Best case scenario, your ORM library (e.g., sequelize if you code in NodeJS) or web development framework (e.g., Django if you code in Python) hides most differences between the various SQL dialects.
Elastisys can help you perform a migration assessment. Thanks to our comprehensive migration assessment guide, we helped customers migrate from US clouds to EU clouds, helping them secure even the most demanding public procurements.
0.3 External Timeline
If the migration is constrained by an external timeline, then this should be explicitly captured in this sub-section. For example, migration might not start before a given date, because of holidays, significant staff being committed to other initiatives, etc. Similarly, a migration might need to end before a given date, because of a customer request, regulation entering into force, audits, etc.
Another time factor to consider are maintenance windows. Ideally, you should already have a maintenance window agreed with a customer, for example, a 2 hours time-window per month. However, there is no “shame” in communicating that an extra maintenance window is required, as long as this is understood and agreed to by the customer.
This section begs for me to reference a meme: No deploy Fridays. No seriously, no guide on migrations would be complete without stating it loud and clear: Do not perform complex migrations before weekend, holidays or when a significant part of the team is unavailable (e.g., KubeCon EU 2025 😉). To de-risk the migration, you really need to plan the day after a migration to resolve “unknown unknowns” and celebrate. Hopefully, by following this guide, you’ll only be busy with the latter. 🥳
0.4 Stakeholders
The migration plan should include a stakeholder analysis. Who should influence and will be influenced by the migration? In RAPID terms, who should review the migration plan (“input”), who should formally approve the migration plan (“agree”) and who is involved in various steps of the migration execution (“perform”). For complex migrations, “perform” might not only involve the engineering team, but also testers, the customer success team, communication team, etc.
Don’t forget to include the customers of the application – whether these are internal or external customers – to the list of stakeholders. At the very least, customers should be informed about the migration. In certain cases, customers might even need to agree to the migration, for example, because they need to strictly control the list of sub-processors, due to GDPR-related requirements or because your maintenance window needs to match theirs.
It goes without saying that the stakeholders in the “agree” group should approve the final version of the migration plan. Depending on the complexity of the migration, the expected impact and the trust within an organization, this may range from a thumbs up over Slack to pushing the migration plan through your Document Control process.
My favorite way to get input and approvals: Since I draft such migration plans in Google Docs anyway, I simply add a comment and assign it to the relevant stakeholder. Once the stakeholder provides input or approval, they can mark the comment assigned to them as resolved. This process is light and – most importantly – doesn’t leave anyone out.
1. Pre-Migration Phase
The purpose of the pre-migration phase is to minimize the risk of the migration, as well as to ensure the migration stays within the agreed maintenance window. My ideal pre-migration feels like a “build-measure-learn” loop where your team “migrates” the old production environment to a staging environment, which is as close as possible to the new production environment. Of course, the staging environment should be sufficiently isolated from the old production environment to minimize impact. For example, your team might want to run it on a separate domain, to avoid LetsEncrypt rate-limiting.
Hence, your pre-migration phase should look as follows.
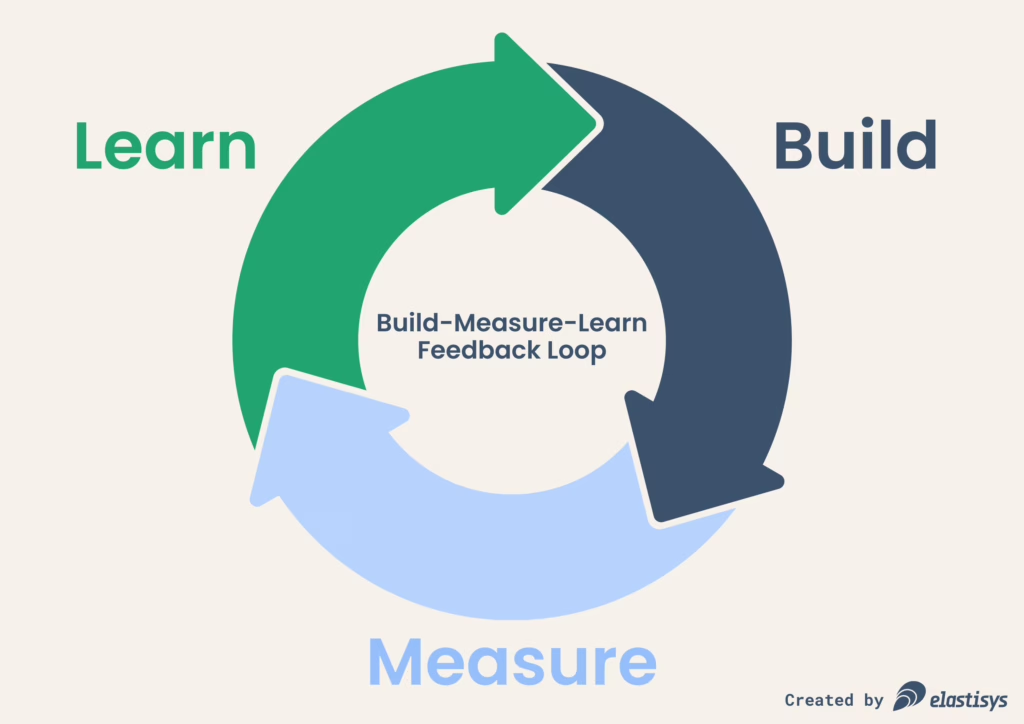
Build
During the build stage, you essentially fill the next section of this document (“Migration Execution”) with the exact steps to perform the migration. I’m a big fan of the Checklist manifesto, so these steps should really feel like an engineer becoming an airline captain during take-off. But you know what’s better than a checklist? It’s machine executable code snippets which perform the more complex migration steps.
A word of caution: I’ve met too many engineering teams who want to code a migration to the point where they can sit back and relax during the migration. By doing so, they likely overengineered the migration, wasting the organization significantly money and time. Given that this specific migration plan will really only be performed once, you should write “just enough code” to de-risk the migration process and make it fit within the maintenance window, but not more! For example, it might simply be quicker to include a checklist item “change the DNS record app.example.com via the UI”, as opposed to writing a script to do that automatically.
Your build stage should particularly focus on copying over state, deploying the application and re-routing traffic.
When it comes to copying state, make sure that data gets copied over incrementally from production to staging. Why incrementally? Because this way, during migration, you don’t need to copy all data, only the new data, hence you increase the chance of staying within the maintenance window. For example, for data you store in object storage, you might want to use something like rclone sync. Similarly, if you use PostgreSQL as a database and your database is large, you should practice restoring from WAL files.
What about deploying your application? If your application is stateless, and properly uses external services to store its state, then deploying your application to a new environment should hopefully be a no-brainer. For example, if you use Argo CD, you just need to configure an Application1 resource with a slightly different values.yaml file and watch the green checkmark appear. If your application is not stateless, perhaps now is the time to make it stateless, otherwise, the migration risks becoming complex and brittle, due to application-specific state migration.
Let us now discuss how to direct traffic to the staging environment. During pre-migration you should use a separate DNS record, such as app-staging.example.com. During migration, you would likely point the production DNS record app.example.com to the IP address of your new application deployment. It is already now a good idea to check if your DNS TTL is low enough to ensure it's not getting cached for too long, and your customers connect to the old IP address. I usually see DNS TTLs of 3600 (1 hour) which is way too high. If your maintenance window is 2 hours, you basically get only one shot to configure DNS right. Therefore, I recommend setting DNS TTL to 300 (5 minutes) already during pre-migration, which should significantly reduce anxiety around making DNS-related mistakes during migration.
Measure
Once you have built the “Migration Execution” section (see phase 2 below), perform it against the staging environment as brainlessly as possible. If you have the option, it might be a good idea to have it performed by a colleague, who was not involved in the build phase above. Why? Given the time pressure, migration can be stressful and – let’s be honest – even the smartest engineer does dumb stuff when stressed.
Learn
Now that you performed the first “migration” it might be a good idea to think about what you learned. Think about the following:
- Are any steps missing?
- Does the application still hard-code certain configuration values, such as connection strings or Content Security Policy?
- Will the real migration be as simple as replacing “staging” with “new production”?
- Are any steps particularly tricky and need more code snippets or checks?
- Should you add some extra testing in the “Post-Migration Phase”, just to not miss something important?
- Can you further reduce the “critical window”, i.e., the time interval during which your customers will notice downtime?
Now go back to “Build” above and repeat. Once you are happy and the migration feels “unexciting”, it’s time to go to the next phase.
2. Migration Execution
The day has finally arrived and it’s time to do the real migration! Hopefully, during the pre-migration phase you already populated this section with a good checklist and code snippets to make this smooth sail. You hopefully also reduced the “critical window” to fit comfortably into the maintenance window, so you avoid stress and disappointed customers.
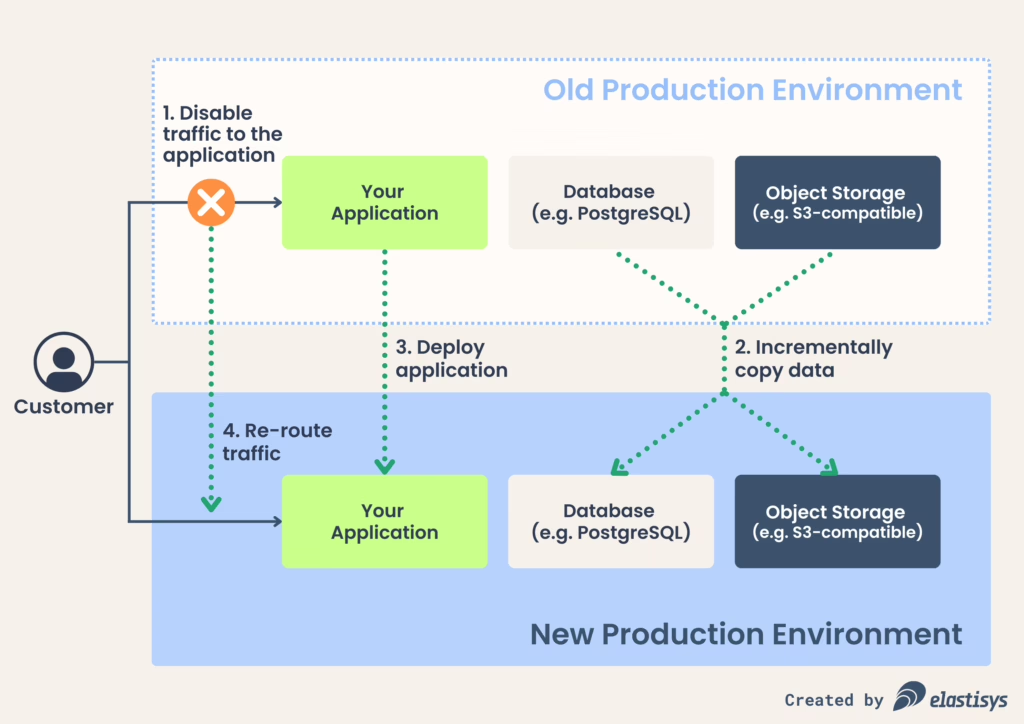
The migration itself should roughly consist of:
- Notifying internal stakeholders that migration is taking place.
- Disabling traffic to the old application to avoid any new data being written. If you are working with Kubernetes, perhaps setting replicas: 0 to your Deployment is enough. Alternatively, you can remove the Ingress resource. Either way, I recommend you do this by copy-pasting a code snippet you devised in the pre-migration phase. This is not the best time to type kubectl scale --help.
- Copy over new data – generally stored in object storage and a database such as PostgreSQL – to the new production environment. Again, use the code snippets and checklists you already produced. This is not a good time to Google “WAL”.
- Deploy your application to the new production environment.
- Re-route traffic to the new production environment, e.g., by changing the DNS record of your application.
- Do a few tests, such as logging in with a test account and performing a few actions in the application, just to make sure that everything is fine.
- Notify internal stakeholders that migration is completed.
- Meditate for 2 minutes. (No, seriously, whoever performed the migration took care enough of the application, now let them take care of themselves.)
Make sure to stay focused. If you notice something missing from the migration plan, but which is not part of the “critical window”, simply write it down in the “follow-ups” sub-section below and perform those steps during the post-migration phase.
3. Post-Migration Phase
If you reach this point, the “critical window” is over and customers are no longer impacted by the migration. Well done!
During post-migration, you should focus on testing, follow-ups, deprecation, and removal.
Testing
During the migration execution phase, you should have performed a few tests to make sure migration didn’t go completely haywire. Now it’s time to do more thorough testing:
- Invite all relevant stakeholders to do their own testing. Perhaps Quality Assurance (QA) has a more extensive test they’d like to run.
- Perhaps you have a trusted customer whom you can ask to double check if everything runs smoothly for them.
- If you have some automated UI testing which you can run against the production environment, now is the time to run it.
- Consider running a link checker on your web properties to make absolutely sure the migration didn’t break any links. My favorite link checker is linkchecker.
- Check the status of other applications or IT systems which depend on your application. Perhaps your analytics solution, such as Matomo might have gotten confused.
Follow-ups
During pre-migration and migration, you must have collected a few follow-up items, i.e., tasks which need to be performed to complete the migration, but are not part of the “critical window”. Examples of such tasks include:
- Reconfigure your CI/CD pipeline to point to the new production environment.
- Make a minor change to the application, e.g., bump the version number without changing any functionality, to test if your CI/CD pipeline still works smoothly.
- Check if backups are still working.
- Check if the Extract, Transform and Load (ETL) process still works as expected to keep your business analysts happy.
Deprecation and Removal
A well-planned migration must finish with a cleanup. Otherwise, you risk leaving a lot of “mess” behind, which will lead to trouble:
- New members of your engineering team might get confused about which is the old production environment and which is the new production environment.
- The data stored in the old production environment might violate GDPR “Right to be forgotten” requests.
- The old production environment might generate unnecessary costs.
The deprecation and removal phase consists in removing the old production environment and associated data. You should perform this step one or two weeks after the migration execution phase is completed to allow sufficient time to battle test the new production environment. This ensures that the old production environment is available for rollback or recovery, should this be needed.
Rollback Plan
Speaking of rollback, “failure to prepare is preparing for failure”. A migration plan must have a rollback plan for two reasons:
- It forces the migration plan to be written with rollback and risk minimization in mind.
- It allows all stakeholders to agree on what to do if unforeseen circumstances require the migration to be aborted.
In most cases, a rollback plan should simply include code snippets and/or a checklist required to direct traffic back to the old production environment. The rollback plan should also state the moment at which rollback is no longer possible or too costly. For example, once the new production environment is up-and-running for over a week, so much data might have been written to it that rollback becomes too costly in terms of data loss and/or effort to avoid said data loss. In that case, it’s better to simply fix the new production environment.
Lessons Learned
“After migration is before migration” – After you perform this migration plan, you will likely want to build upon it to migrate your next application or shelve it for a future migration.
This section should be filled after the stakeholders approved the migration plan and after all migration phases are completed. The section should capture learnings from the planning and performing the migration. This will allow your organization to learn and make future migrations even smoother.
Once you have filled this section, I strongly recommend sharing the migration plan again with all stakeholders, both to “sell” your amazing work, but also for the sake of knowledge sharing. Needless to say, knowledge sharing is an important value that helps many companies, including Elastisys, grow and incrementally get better at what they do.
Summary
We hope this blog post will help you draft your migration plans and go from “migration anxiety” to “migration … done”. 🙂
Ready to begin your migration journey? At Elastisys, we help organizations navigate complex cloud migrations with confidence – minimizing disruption while ensuring compliance and peace of mind. Need guidance tailored to your specific needs? Get in touch with our experts or schedule a free consultation here. Let’s take the uncertainty out of your migration.
Footnotes:
1. This is an Argo CD API object. The Kubernetes documentation style guide requires API object to be written in upper case camel case: https://kubernetes.io/docs/contribute/style/style-guide/#use-upper-camel-case-for-api-objects↩

Blog post by Cristian Klein
I’m Cristian, the Welkin product owner at Elastisys. I review data protection regulations and security best practices, to translate those into Kubernetes and Cloud Native solutions. I gathered over 20 years of experience acting variously as an on-call network engineer, consultant, teacher and researcher. You can follow me on LinkedIn, where I post about topics at the intersection of information security and Kubernetes.