In this blog post, we will go through everything needed to use Google as your identity provider in a Kubernetes cluster. If you have an organization that uses Google cloud and you want to use this to set group permissions in Kubernetes then this post is perfect for you.
When working in any sector where compliance regulations exist, one essential part is managing who is allowed to do what and audit logging. For these regulations using a generic kubeconfig file shared between operators is not an option.
Handling permissions in one place such as an LDAP, Active Directory, or in this case Google groups is usually the best approach when dealing with larger organizations. In this way, you can have the entire development team in one group with shared permissions. The rest of this tutorial will be about how to transfer these groups into a Kubernetes cluster and how to use these groups to authenticate towards the Kubernetes API server.
Dex
Dex is an identity Provider that uses OpenID Connect to drive authentication for other apps. Dex is open source and is a CNCF sandbox project. We will use Dex installed inside the cluster to connect the Google identity provider with the Kubernetes API server. Dex can then also be used to connect other applications with OIDC.
Prerequisites
- kubectl cli
- helm cli
- A running Kubernetes cluster with control over the API server, managed services such as GKE will generally not give you control over this. If you don’t have a cluster running we would recommend using kubespray.
- A Google organization with some groups enabled. If you don’t have this set up yet please go to Google’s documenataion
Clone the repo
All of the code examples used are available on GitHub https://github.com/elastisys/dex-with-google-accounts. The easiest way forward is to clone or fork the repo and then modify the files as we go. Another solution is to just use it as inspiration and create your own files.
git clone git@github.com:elastisys/dex-with-google-accounts.gitAPI server OIDC flags
If you already have a cluster you will need to set some flags in the Kubernetes API server to allow OIDC to be used for authentication. You will need to set the following flags. For more information on the flags.
--oidc-client-id=kubelogin
--oidc-issuer-url=https://dex.example.com
--oidc-username-claim=email
--oidc-groups-claim=groups
If you are using kubespray these options are set in this configuration file https://github.com/kubernetes-sigs/kubespray/blob/master/inventory/sample/group_vars/k8s-cluster/k8s-cluster.yml#L46-L53
Google service accounts
For dex to be able to fetch groups from Google you will need to create a Google Service Account. Follow these steps:
- Go to Google console -> IAM & Admin -> Service Accounts -> Create new service Account
- Fill out Service account name and ID. You can skip
Grant this service account access to the projectandGrant users access to this service account, as they are both optional. - After creating the account find it in the list of Service Accounts and go to its details page.
- Enable G Suite domain-wide delegation
- Go to keys and create a new key of type JSON. This key needs to be saved for later.
For these next steps, you will need to have admin rights to your Google organization.
- Delegate API scopes to the service account. delegate the https://www.googleapis.com/auth/admin.directory.group.readonly scope and only this scope. If you delegate more scopes to the service account, it will not be able to access the API.
- Enable the Admin SDK
Entire documentation of this is available in the Dex documentation
Set up Google ClientID for oauth2.0
Go to API & services -> credentials and create new credentials for OAuth Client ID and Application type Web application.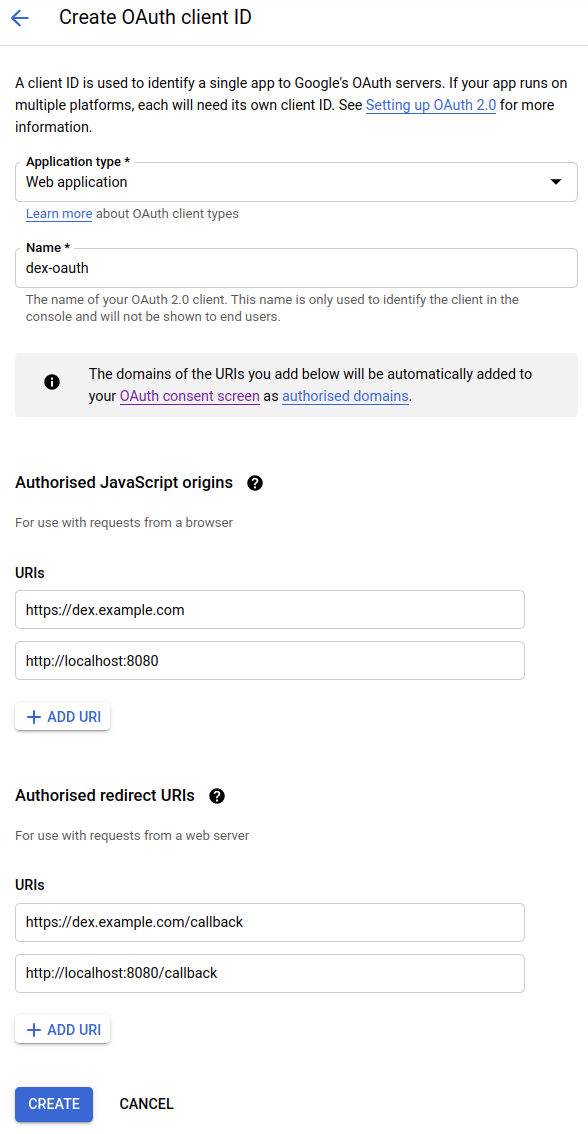
Ingress controller
There are many options for getting traffic into your cluster. We prefer using an ingress controller and then use ingress objects for host based routing. In this example, the Nginx-ingress controller is used. It is set up as a DaemonSet with hostNetwork enabled. This will let the ingress controller handle all incoming traffic to the worker nodes at ports 80 and 443. If you are using a cloud provider with native Kubernetes LoadBalancer support this is not needed and you can simply expose the ingress controller as a Service of type LoadBalancer.
We install the ingress controller using this helm chart.
First, modify the nginx-values.yml file in the repo then run these commands to install the helm chart.
helm repo add ingress-nginx https://kubernetes.github.io/ingress-nginx
helm repo update
helm install --values nginx-values.yml ingress-nginx ingress-nginx/ingress-nginx
Dex installation
In order for Dex to read the Google groups, it needs access to the service account we created earlier. To do this we will insert the service account into a Kubernetes Secret. First, get the base64 encoded version of the service account key saved from the Google service accounts section:
cat | base64 -w0Then copy the output to the data field in google-sa-secret.yml and run:
kubectl apply -f google-sa-secret.ymlTo install dex we will use the official Dex helm chart. To install modify the code in dex-values.yml and run the commands:
helm repo add dex https://charts.dexidp.io
helm repo update
helm install --values dex-values.yml dex dex/dex
Information about the config options in Dex can be found at https://dexidp.io/docs/connectors/google/#configuration
Cert manager
To authenticate to the Kubernetes API server Dex need to be running valid certificates. When dealing with certificates in Kubernetes it is usually a good idea to use cert-manager. cert-manager handles creating, validating, and rotating certificates for you.
To install cert-manager in the cluster we have to first install the CRDs with:
kubectl apply -f https://github.com/jetstack/cert-manager/releases/download/v1.2.0/cert-manager.crds.yamlThen we have to create an issuer using the issuer.yml. Change the email field in the manifest then run:
kubectl apply -f issuer.ymlFinally, we create a namespace for cert-manager and install the helm chart.
kubectl create ns certmanager
helm repo add jetstack https://charts.jetstack.io
helm repo update
helm install cert-manager jetstack/cert-manager
Kubelogin
Kubelogin(also called oidc-login) is a kubectl plugin for Kubernetes OpenID Connect (OIDC) authentication. You can install Kubelogin using:
kubectl krew install oidc-loginFor installation guide or help with Kubelogin go to its official repo
We need to modify the kubeconfig and add a user with oidc flags for authentication through OpenID Connect. The finished user config looks like this:
- name: oidc
  user:
   exec:
     apiVersion: client.authentication.k8s.io/v1beta1
     args:
     - oidc-login
     - get-token
     - --oidc-issuer-url=https://dex.example.com
     - --oidc-client-id=kubelogin
     - --oidc-client-secret=dex-test
     - --oidc-extra-scope=email
     - --oidc-extra-scope=groups
Add this as a user in your kubeconfig to use oidc as the authentication method. Here is a sample kubeconfig
Role-based Access Control (RBAC) rules
We will demonstrate how to set the RBAC rules with two groups, a dev group and an admin group.
Users in the dev group are given admin access to the dev namespace and view access of nodes and namespaces while the users in the admin group will have access as an admin of the cluster.
The example below show an RBAC example of how to bind the admin@example.com group to the cluster admin role.
apiVersion: rbac.authorization.k8s.io/v1
kind: ClusterRoleBinding
metadata:
  name: user-admin
roleRef:
  apiGroup: rbac.authorization.k8s.io
  kind: ClusterRole
  name: cluster-admin
subjects:
- apiGroup: rbac.authorization.k8s.io
  kind: Group
  name: admin@example.com
To deploy the example RBAC edit the files dev-role.yml and admin-role.yml to match the groups in your organization then run:
kubectl apply -f dev-role.yml
kubectl apply -f admin-role.yml
Testing the new user
First, be sure that you are actually using the new user. You can change the user in the current context with:
kubectl config set-context --current --user=oidcThen we can run some tests to make sure the user has the correct privileges. Let’s say your user is in the dev group then we can use kubectl auth can-i for validation.
$ kubectl auth can-i get pods
no
$ kubectl auth can-i get nodes
yes
$ kubectl auth can-i get namespaces
yes
$ kubectl auth can-i create pods -n dev
yes
$ kubectl auth can-i create secrets -n kube-system
no
Summary
In this blog post, we have done everything needed for using Google accounts as an identity provider for Kubernetes access. We have done this by.
- Setting the OIDC flags in the Kubernetes API server.
- Creating Groups in Google accounts.
- Creating a service account with access to those groups.
- Creating an OAuth Client ID in Google.
- Installing the Nginx-ingress controller for routing traffic in the cluster.
- Installing cert-manager to handle certificates in the cluster.
- Installing Dex with the Google connector.
- Installing and setting up Kubelogin.
- Creating some simple RBAC rules for two different groups.
- And finally testing the access using
kubectl auth can-i
Hopefully, this tutorial was helpful and can help with your journey of running a Kubernetes cluster with Dex as identity provider according to best practices.