This article explains how Virtual Machine (VM) images are booted onto virtual disks. It explains nitty gritty details about disk layouts and the cloud-init boot process. Read further if you want to customize your Kubernetes nodes or make the best of your cloud provider.
The Ubuntu 18.04.5 LTS Cloud Image is 361MB. To minimize VM creation time, said image is actually a snapshot of a ready-to-boot disk. This is unlike a USB/ISO image — commonly used for installing Ubuntu on laptops — which sets up the disk and copies files over. So if the cloud image is a ready-to-boot disk, how come you can use the full disk size after booting? How does a 361MB disk image “become” a 10GB disk? Where does all that magic happen?
How Does a VM Boot?
Let us briefly go over the process of booting an Operating System on bare metal. The firmware (a.k.a. BIOS or UEFI) will search for a suitable disk. Said disk will contain a system partition (roughly “/boot”) which contains the bootloader and kernel images. As expected, the system partition needs to be formatted using a filesystem that is understood both by UEFI and bootloader, generally FAT32. Operating system configuration, including hostname, users, passwords, SSH authorized_keys, various daemon configurations, are all stored on the disk itself.
A VM boots similarly, with the hypervisor taking the role of the UEFI. However, to allow VMs to boot from a disk template, usually called cloud image, they need to take configuration parameters from the cloud provider, instead of having them hard-coded in the cloud image. For example, the VM learns its hostname from the so-called VM meta-data. This information is under the control of the cloud provider and can’t be changed by the cloud user. Other configurations, including root password, SSH authorized_keys, are configured by the cloud user and transmitted by the cloud provider to the VM via user-data. Implementation-wise, these two are merely two text files — actually called meta-data and user-data — packaged in an ISO-format file. Yes, the same ISO-format that was used for Compact Disks (CDs). Funny enough, said ISO file is actually exposed to the VM as a virtual CD-ROM.
Enough English, show me some code.
To get started, install wget, qemu-img, genisoimage and kvm. On a recent Ubuntu (e.g., 20.04.1 LTS), this can be achieved by:
sudo apt-get install wget qemu-utils genisoimage qemu-kvm
Then run the following script:
The script is a simplified version of how your cloud provider usually boots a cloud image. qemu-img is used to create a 20GB copy-on-write disk from the cloud image, to serve as the virtual disk. Since VMs are likely to share parts of the disk, a copy-on-write strategy only stores the differences between the VMs’ disks, and is likely to save physical disk space. The script then writes meta-data and user-data, and packs them into an ISO format file using genisoimage. Finally, the hypervisor — KVM/qemu in this example — is instructed to boot a VM which is wired to the virtual disk and a virtual CDROM containing its configuration.
Go ahead and play with the script yourself! Just for fun, the script shows the block devices — a.k.a., disks — that are presented to the VM:
[   17.143703] cloud-init[1163]: NAME    MAJ:MIN RM  SIZE RO TYPE MOUNTPOINT
[   17.144808] cloud-init[1163]: fd0       2:0    1    4K  0 disk
[   17.145610] cloud-init[1163]: sr0      11:0    1 1024M  0 rom
[   17.146399] cloud-init[1163]: vda     252:0    0   20G  0 disk
[   17.147463] cloud-init[1163]: ├─vda1  252:1    0 19.9G  0 part /
[   17.148462] cloud-init[1163]: ├─vda14 252:14   0    4M  0 part
[   17.149429] cloud-init[1163]: └─vda15 252:15   0  106M  0 part /boot/efi
[   17.150434] cloud-init[1163]: vdb     252:16   0  366K  0 disk
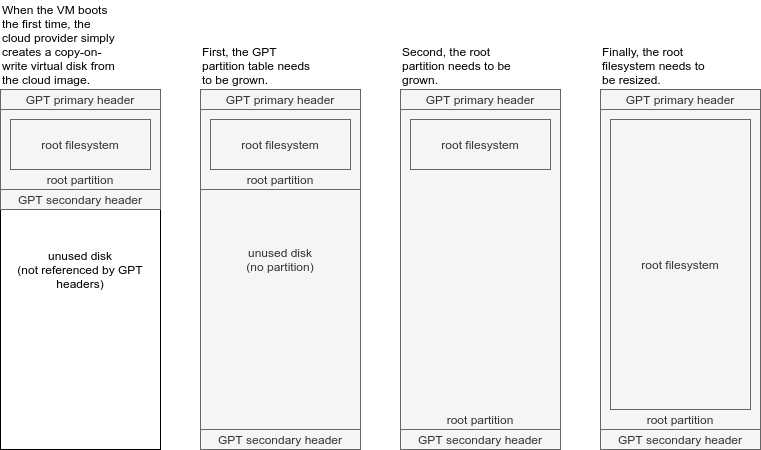
vda is the copy-on-write virtual disk, with vda15 being the UEFI system partition and vda1 being the root filesystem. vdb is the virtual CD-ROM containing meta-data and user-data. Surprisingly, vda1, the root filesystem, already fills our virtual disk and uses the full 20G.
How did that happen?
Enter cloud-init
Most often, the user-data contains a cloud-init configuration file. Cloud-init is an industry standard for cloud instance initialization. It is a YAML file that configures various aspects of the VM, such as root password, users, SSH authorized_keys, etc. It even allows custom commands to be run early in the boot process (via the bootcmd key) or at the very end (via the runcmd key). In fact, the script already uses runcmd to conveniently display the block devices exposed to the VM.
The cloud-init configuration file is read and interpreted by … cloud-init! This is a Python script with various modules, responsible for interpreting the cloud-init configuration and configuring the VM accordingly. Two modules, which are enabled by default, “magically” grow the cloud image. Growpart grows the partition table and root partition, while resizefs resizes the filesystem. Too fast? Let’s illustrate this with some figures:
Let us uncomment the various parts of user-data in the script above to see these two cloud-init modules in action. With resize_rootfs: false, we get the following output (some parts are cut out, to focus on what is important):
[ 16.388487] cloud-init[1177]: NAME MAJ:MIN RM SIZE RO TYPE MOUNTPOINT
[...][ 16.392970] cloud-init[1177]: ├─vda1 252:1 0 19.9G 0 part /
[...][ 16.402108] cloud-init[1177]: Filesystem Size Used Avail Use% Mounted on
[ 16.410402] cloud-init[1177]: /dev/vda1 2.0G 1.1G 966M 52% /
Notice that lsblk reports that the root partition, vda1, was grown to 20GB. However, df -h shows that the file system itself was not grown and is only 2GB in size.
Now let us check what growpart: mode: false does:
[ 19.446021] cloud-init[1113]: NAME MAJ:MIN RM SIZE RO TYPE MOUNTPOINT
[...][ 19.450037] cloud-init[1113]: ├─vda1 252:1 0 2.1G 0 part /
[...][ 19.459339] cloud-init[1113]: Filesystem Size Used Avail Use% Mounted on.
[...][ 19.465252] cloud-init[1113]: /dev/vda1 2.0G 1.1G 966M 52% /
Here we notice that lsblk shows that the partition vda1 was not grown, and is still 2GB in size. The resize_rootfs has no measurable effect here. In fact, we get the same output both with and without resize_rootfs. This is because, without resizing the root partition, there is no space to grow the root filesystem into.
Conclusions
“We often fear what we do not understand; our best defense is knowledge.”
Tuvok, Star Trek
I hope I clarified how VM disk layout works. You are now empowered to use this knowledge to configure a Kubernetes cluster, and specifically the storage provider, according to your needs. This may help you enable Kubernetes on your favorite cloud provider that may lack dynamically attached virtual disk support or squeeze out the last few MB/s of a local NVMe storage.
As always, don’t hesitate to reach out if you would like us to take care of your special Kubernetes storage needs.
Like this article and want to learn more about Kubernetes? Get a notification when the next article in the “Under the hood”-series is dropped by signing up to the newsletter or follow us on Linkedin or Twitter.

